Your Guide to Automatic Email Forwarding
Automatic email forwarding is a simple but incredibly useful trick. At its core, it’s just a rule you set up in your email account that automatically sends incoming messages to another address. Think of it as your personal digital mail clerk, sorting and rerouting messages so you don't have to. It's a fantastic way to consolidate several inboxes, make sure a team has coverage, or just manage multiple accounts without constantly logging in and out.
Why You Should Use Automatic Email Forwarding

Don't dismiss automatic forwarding as just another tech feature; it's a strategic move for anyone trying to master modern communication. I’ve seen this simple function become a complete lifesaver in countless real-world scenarios, helping people boost their productivity and build more resilient workflows. Instead of juggling three or four different inboxes every single day, you can funnel everything into one place.
For a lot of professionals, this is a total game-changer. Take a small business owner, for example, who has separate email addresses for sales, support, and general inquiries. By setting up automatic forwarding, every single message can land in their main inbox. This simple setup is often the difference between catching a critical customer query and letting it fall through the cracks.
Streamline Your Personal and Professional Life
On a more personal level, forwarding is a great way to declutter your digital life. Most of us have old email accounts from college or a previous job that we rarely check but that still receive important updates. Setting up forwarding from these legacy accounts to your main email means you won’t miss old contacts trying to reconnect or important notifications, all without the hassle of remembering old passwords.
This kind of organization is key to staying focused. When you create one central hub for all your email, you aren't constantly being pulled in different directions. It allows for better management, faster response times, and a much less fragmented day.
A Growing Market for a Critical Need
It's clear just how much we've come to rely on this. The global market for email forwarding services was valued at USD 2.5 billion in 2023 and is expected to more than double, hitting USD 5.7 billion by 2033. This surge shows just how essential good email management has become as we all try to handle a relentless flood of digital mail. If you're curious about the data, you can explore the full email forwarding service market research to see the trends for yourself.
Key Takeaway: Automatic email forwarding isn't just a convenience—it's a productivity system. It helps you consolidate communication, ensure business continuity, and stay in control of your digital identity.
Once you get the hang of it, you're not just rerouting emails. You're designing a smarter, more reliable communication system for yourself or your team. This is especially valuable when a colleague goes on vacation; forwarding their work email to someone covering for them ensures that client needs are handled without any delay. It’s a fundamental tactic for any well-organized digital workspace.
How to Set Up Forwarding on Major Platforms
Setting up automatic email forwarding is one of those tasks that sounds technical but is surprisingly simple once you know where to look. While the process is straightforward on most platforms, the exact clicks and menus can vary. Getting it right usually just takes a few minutes.
I’ll walk you through how it’s done on the big three: Gmail, Outlook, and iCloud. Each one has its own little quirks, but they all share one critical security step: verifying the destination address. This ensures your emails are going exactly where you intend them to.
The core idea is always the same: dive into your settings, pop in the forwarding address, and confirm it.
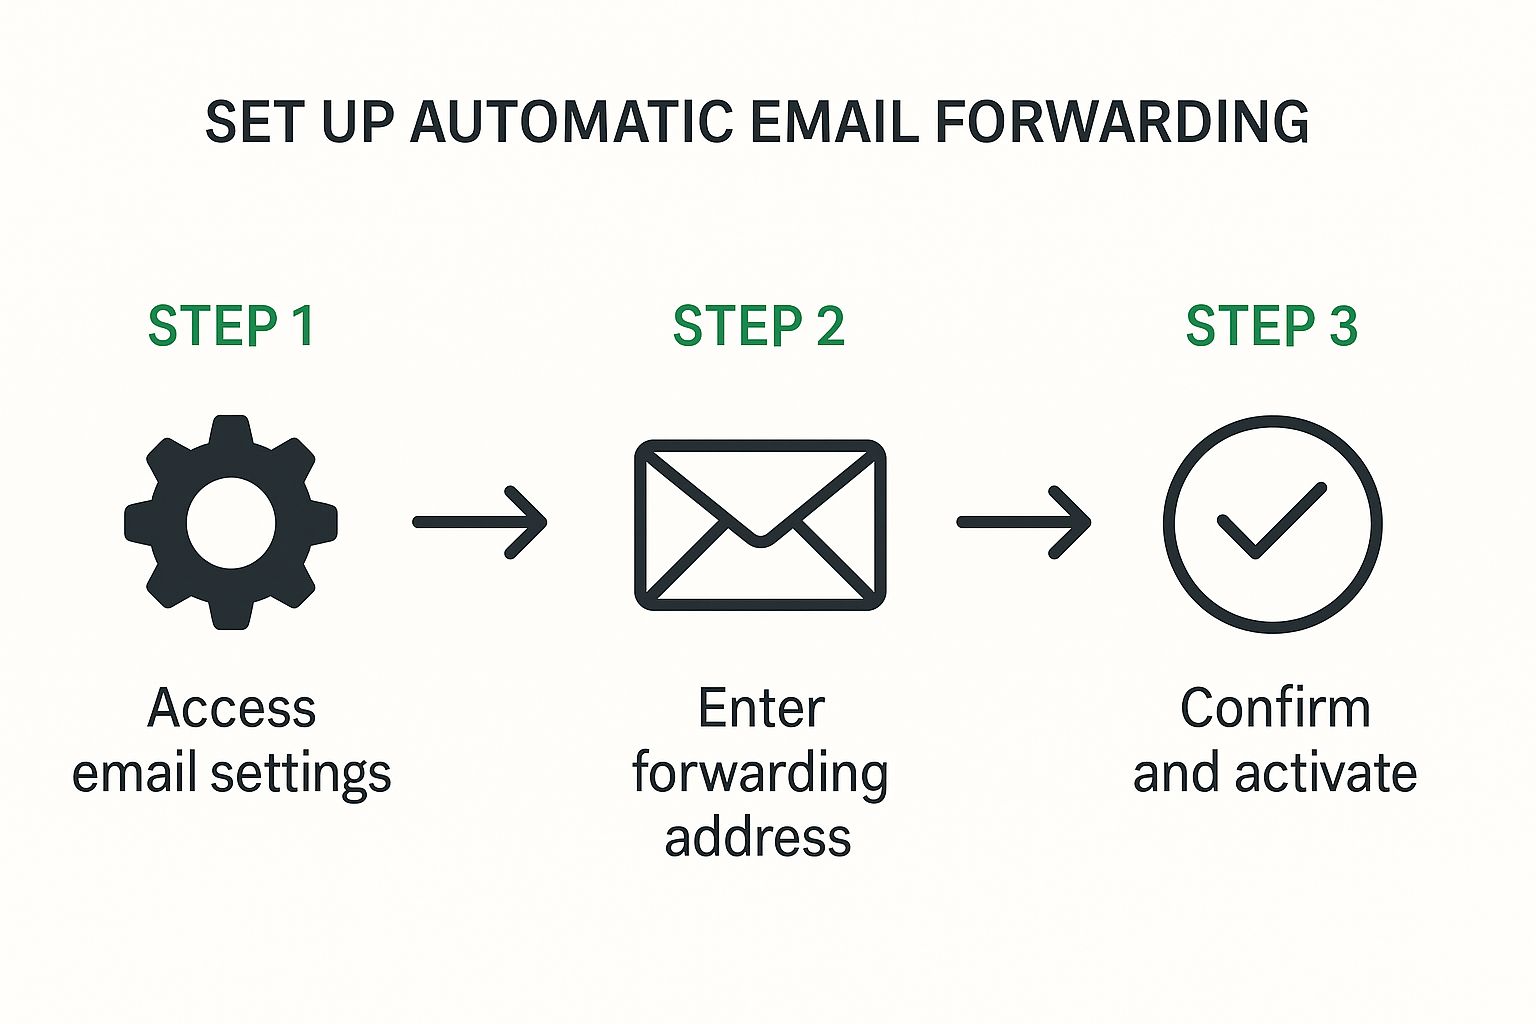
This graphic really breaks down the workflow. No matter your provider, the fundamentals are consistent and accessible.
Forwarding Emails in Gmail
Gmail makes the setup process clear, but its settings are tucked away in a specific tab. First, log into the Gmail account you want to forward messages from.
From your inbox, look for the gear icon in the top-right corner, then click "See all settings" to open the full dashboard. Your destination is the "Forwarding and POP/IMAP" tab. This is your command center for all things forwarding.
In this section, click the button labeled "Add a forwarding address." A pop-up will appear, asking for the email address you want to send your mail to.
Once you’ve entered the address, Gmail sends a verification email to that inbox. This is a non-negotiable security measure. You'll need to log into that second account, find the email from the Gmail team, and click the confirmation link inside.
After you've verified it, head back to your original Gmail account’s "Forwarding and POP/IMAP" settings. You’ll now see the new address is available. Select it, and then decide what happens to the original email in your Gmail inbox.
- keep Gmail's copy in the Inbox: This is the safest bet, essentially creating a backup.
- mark Gmail's copy as read: Great for keeping a copy without it cluttering your unread count.
- archive Gmail's copy: Moves the email out of the inbox but keeps it for your records.
- delete Gmail's copy: Be careful with this one. It’s permanent and offers no backup.
Always remember to hit "Save Changes" at the bottom of the page to lock it in.
Enabling Forwarding in Outlook
The process for Outlook.com is just as smooth, with the settings easily reachable from the main toolbar. After logging in, find the Settings icon (a gear) in the top-right.
A sidebar will pop out. Down at the bottom, select "View all Outlook settings." This launches a more detailed settings window. From here, navigate to "Mail" and then click on "Forwarding."
A Quick Tip from Experience: Before you hit save, double-check that forwarding address for typos. I've seen it happen—a single wrong letter can send your private emails to a complete stranger. It’s a two-second check that can prevent a massive privacy headache.
In the forwarding menu, just check the box to "Enable forwarding" and type in the destination email. One crucial decision here is whether to "Keep a copy of forwarded messages." I almost always recommend keeping this box checked. It’s your safety net, ensuring a copy of every email remains in your Outlook account.
Finally, click "Save." Outlook will start redirecting new incoming mail immediately. If you’re juggling accounts, it’s worth taking the time to compare email providers for your needs to see which one's features truly fit your workflow.
Configuring Forwarding on iCloud Mail
For those in the Apple ecosystem, forwarding is handled through the iCloud.com web interface. The setup is as clean and minimalist as you’d expect from Apple.
Start by logging into your account at iCloud.com and opening the Mail app. Inside, find the Settings icon (another gear) in the sidebar and choose "Preferences…" from the menu that appears.
In the Preferences window, make sure you're on the "General" tab. You'll see a checkbox labeled "Forward my email to." Tick this box and type your destination address into the text field right next to it.
Just like the others, iCloud gives you an important choice: "Delete messages after forwarding." In my experience, leaving this unchecked is the best practice. It preserves a copy on iCloud’s servers, giving you a priceless backup if anything goes wrong. Once you’ve made your choice, click "Done" to save and activate the rule.
Feature Comparison Across Major Email Providers
Choosing the right email service for your needs often comes down to the small details. When it comes to something as specific as email forwarding, the options can differ just enough to make one platform a better fit for you than another.
Here’s a quick side-by-side look at how Gmail, Outlook, and iCloud handle forwarding features.
| Feature | Gmail | Outlook | iCloud |
|---|---|---|---|
| Verification Required | Yes, via confirmation link | No, but recommended to check | No, but recommended to check |
| Keep Original Copy | Yes, with multiple options (read, archive, delete) | Yes, simple on/off toggle | Yes, simple on/off toggle |
| Conditional Forwarding | Yes, using advanced filters | Yes, using inbox rules | No, forwarding is all-or-nothing |
| Forward to Multiple Addresses | No, only one primary forwarding address | No, only one primary forwarding address | No, only one primary forwarding address |
This table highlights that while all three get the basic job done, Gmail offers the most granular control over what happens to the original email. If you need more complex rules, like only forwarding emails from a specific sender, you’ll need to explore the filters in Gmail or the rules in Outlook. iCloud, on the other hand, keeps it incredibly simple: it's either all on or all off.
Using Rules and Filters for Smart Forwarding

Basic email forwarding is useful, but it's a blunt instrument—it sends everything. The real game-changer is when you start using rules and filters for conditional forwarding. This is where you can get incredibly specific, turning a chaotic inbox into a finely tuned, automated machine that works for you.
Think of it this way: instead of just dumping all your mail into a new box, you're telling your inbox, "If an email looks like this, send it over there." For instance, I once worked with a freelance designer who set up a rule to instantly forward any email from a major client's domain (let's say "BigProject.com") to a special project management address. Simple, but brilliant. It kept all their critical communications in one place without touching their main inbox.
This isn't just a neat trick; for many of us, it's a survival tactic. With global email traffic expected to reach nearly 376 billion messages a day by 2025, the flood of information is only getting worse. I've seen reports that some finance professionals get more than 135 emails daily. You can discover more insights about these email usage trends to see just how big the problem is. Smart forwarding is how you stay afloat.
Crafting Your First Smart Forwarding Rule
Building a rule is actually pretty straightforward. It’s all based on a simple "if/then" logic: if an email meets certain conditions you set, then your email client performs a specific action. All the major players, like Gmail and Outlook, have powerful rule-creation tools tucked away in their settings.
Here are a few real-world scenarios to get you started:
- Taming Invoices: Automatically forward any email with "invoice" or "receipt" in the subject line straight to your bookkeeper or an accounting email address. No more manual sorting.
- Curating Newsletters: Tired of newsletters cluttering your primary inbox? Create a filter that catches them all and forwards them to a read-later service like Pocket or a dedicated "reading" email address.
- Boosting Team Response: A project manager could set a rule to forward emails containing "urgent support ticket" to the entire support team's group email. This ensures the right people see it instantly.
The best part is that you can stack conditions for even more precision. For example, you could create a rule that only fires if an email is from a specific sender AND contains a certain keyword in the message body.
My Personal Tip: Start small and simple. The first rule I always recommend people create is for financial documents. Set one up to forward all your Amazon receipts to a dedicated folder or email. It’s a low-risk, high-reward automation that proves the concept beautifully.
Key Conditions to Build Your Rules
To really get the hang of this, you need to know what your building blocks are. These are the most common triggers you'll find in any email platform's filter settings.
Common Rule Triggers:
- From (Sender): This is the most popular one. Forward emails from a specific person, an entire company domain (@client.com), or a predefined contact group.
- Subject Contains: This lets you grab emails based on words in the subject line, like "Project Update" or "Action Required." It's incredibly reliable.
- Has the words (Keywords): This trigger scans the actual body of the email for certain words. It's a lifesaver for categorizing messages that don't have predictable subjects.
- Has an attachment: You can automatically forward every email that includes an attachment, which is a great way to create a centralized repository for important documents.
As you begin setting up these automations, always think about the sensitivity of what you're forwarding. For anything confidential, it's worth taking a moment to understand your options for security. You might want to read our article on the top benefits of encrypted email you need to know to make sure your data is protected as it moves between accounts.
Navigating Security Risks and Privacy Concerns
Automatic email forwarding is a fantastic tool for convenience, but it comes with some serious strings attached. If you’re not careful, the very feature that consolidates your inboxes can become a major security blind spot. It’s a powerful capability, but using it safely requires a bit of foresight.
The most common trap I see people fall into is forwarding a secure work email to a less-secure personal account, like a standard Gmail or Yahoo address. Think about it: your company email is likely wrapped in layers of enterprise-grade security. Your personal account? It might just have a single password guarding the gate.
When you forward emails containing financial data, client details, or confidential company strategy, you're essentially making a copy of that sensitive information and moving it outside your organization's protected environment. This one simple action can easily spiral into a compliance nightmare and a huge data governance headache.
The Corporate Crackdown on Forwarding
It’s no surprise that organizations are waking up to these dangers. We're seeing a clear trend where companies are putting strict policies in place to either ban or severely limit automatic forwarding to outside email addresses. These aren’t just friendly suggestions—they are hard-and-fast rules designed to stop data leaks before they happen.
For a real-world example of this, look at how some large institutions are responding. A major U.S. university system, for instance, is banning all rule-based automatic email forwarding from its Microsoft 365 platform to external services, effective October 1, 2025. This policy specifically targets automated rules to prevent data from slipping through the cracks, while still allowing people to manually forward individual messages when necessary. You can get a better sense of this trend by reading more about how institutions are changing their forwarding policies.
Key Takeaway: Unchecked email forwarding creates a data trail that you might not control. Once an email leaves its original secure environment, it's subject to the security policies—or lack thereof—of the receiving service.
Getting a handle on these issues is critical. For a deeper look into keeping your accounts locked down, our complete defense guide to email security threats is a great resource.
Best Practices to Mitigate Forwarding Risks
If you still decide that automatic forwarding is right for you, it's absolutely crucial to do it safely. A few smart practices can make a world of difference in reducing your exposure to privacy breaches and security incidents.
Here’s what I recommend:
- Audit Your Rules Regularly: Don't just set it and forget it. Make it a habit to check your forwarding rules every few months. If a rule is no longer needed, turn it off. Simple as that.
- Forward to Secure Destinations: If you must forward, send those emails to an address that has equally strong security. Ideally, this would be another account on a private, secure platform like Typewire, not a free, ad-supported service.
- Use Conditional Forwarding: Instead of a blanket forward-all rule, get specific. Create filters that only forward non-sensitive emails, like newsletters or system notifications. You can set them to block anything with sensitive keywords like "invoice" or specific client names.
- Keep a Copy: This one is non-negotiable. Always, always configure your forwarding to keep a copy of the message in the original inbox. This serves as your primary record and a crucial backup.
How to Fix Common Forwarding Problems
Even the most carefully configured automatic email forwarding can hit a snag. One minute everything is working perfectly, and the next, a crucial message goes missing. When things go wrong, the solution is usually straightforward—you just have to know where to look.
Most forwarding issues boil down to a few usual suspects, from emails getting flagged as junk to them vanishing into thin air. Let's walk through how to troubleshoot these frustrating hiccups.
Pinpointing Where Emails Are Going
The most common panic-inducing moment is when you realize, "My forwarded emails aren't arriving!" Before you jump to conclusions, your first stop should always be the spam or junk folder in the receiving account. Honestly, overeager spam filters are the culprit more than 90% of the time.
If you come up empty in the spam folder, it's time to check for typos. I can't tell you how many times I've seen a single misplaced letter in an email address cause weeks of important messages to be sent to a total stranger.
- Check the Forwarding Address: Go back into your original account’s settings. Look very closely at the forwarding address you entered. Is every single character correct?
- Confirm Verification: Services like Gmail won't start forwarding until you click a confirmation link sent to the destination address. Dig through that inbox to make sure the verification step was actually completed.
- Review Your Rules: If you set up forwarding with specific conditions, your rules might be too narrow. For example, a filter looking for the word "invoice" will completely miss an email with the subject line "Your Receipt."
A Quick Troubleshooting Tip: Grab a third email account and send a test message to your primary inbox. This simple action lets you trace the email's entire journey. If it lands in the primary account but never shows up at the destination, you know the problem is with your forwarding setup.
Escaping a Forwarding Loop
A forwarding loop is a rare but messy situation. It happens when two accounts are set to forward emails to each other, creating an endless, back-and-forth cycle of messages. This can crash both inboxes in a hurry and might even get your accounts temporarily suspended by your provider.
The fix is simple and direct: log into one of the accounts and kill the automatic email forwarding rule immediately.
To avoid this digital vortex in the first place, never set up two-way forwarding between accounts. A better strategy is to designate one inbox as your central hub. Forward emails to it from your other accounts, but never set up rules that forward from the hub back to those same accounts. This keeps your communication flowing in one clear direction and prevents a total system meltdown.
Still Have Questions About Email Forwarding?
Even with the best instructions, a few questions always seem to pop up when setting up automatic forwarding. Let's tackle some of the most common ones I hear from people trying to get their email workflow just right.
Can You Automatically Forward Only Certain Emails?
Absolutely. In fact, this is how you should be doing it for maximum efficiency. While you can create a blanket rule to forward every single thing that hits your inbox, it's rarely a good idea. That's a fast track to cluttering up another account.
Instead, all the major players like Gmail and Outlook have powerful filtering tools built right in. You can get incredibly specific.
Think about it this way: you could set up a rule that only forwards emails:
- From a specific client, like any message from @bigproject.com.
- With a keyword in the subject, such as "Invoice" or "Urgent Request."
- That include an attachment, which is great for routing documents.
Getting smart with filters is what separates a messy forwarding setup from a genuinely useful one.
Do Auto-Forwarded Emails Show Up In My Sent Folder?
This is a big one, and the answer is almost always no. Your email service doesn't see a forwarded message as something you sent. It sees it as an incoming message that's being rerouted based on a rule you created. Because of this, it won't appear in your "Sent Items."
This is precisely why ticking the box to "keep a copy in the inbox" is non-negotiable.
My Pro Tip: Always, and I mean always, keep a copy of the original message. If you don't, the first account will have zero record that the email ever existed. That setting is your safety net and your primary archive.
Without it, if the email gets lost or deleted on the other end, it’s gone for good.
Is Automatic Email Forwarding Instantaneous?
It's fast, but not quite instant. Think of it as a near-immediate process. When an email hits your server, it has to be received, scanned, checked against your forwarding rules, and then re-sent to its new destination. The whole trip usually takes just a few seconds, maybe a minute or two at most.
But sometimes, things can get held up. A few potential bottlenecks include:
- Heavy server traffic on either your end or the recipient's.
- Spam filters at the destination, which might quarantine the message for a quick scan.
- The email's size—big attachments will naturally take longer to process and send.
For 99% of what you do, you'll never notice the delay. Just don't bank on it being truly instantaneous for something that is hyper-time-sensitive down to the second.
Can I Forward Emails to More Than One Address at Once?
This is a common request, but most email platforms don't let you pop multiple addresses into a single forwarding rule. Services like Gmail, Outlook, or iCloud typically limit you to one destination address in their main settings.
But there's a pretty slick workaround.
Instead of forwarding to an individual, you can forward everything to a group distribution list. A Google Group is a perfect example. You set up the group, add all the email addresses you want, and then point your forwarding rule to that single group address. It's a fantastic strategy for teams that need to keep an eye on a shared project or client inbox.
Ready to manage your communications in a completely private and secure environment? Typewire offers premium email hosting built on a foundation of privacy, with no ads, no tracking, and zero data mining. Take full control of your digital correspondence today.
Your Guide to Automatic Email Forwarding
Posted: 2025-08-02
Canadian Data Sovereignty: Your 2026 Business Guide
Posted: 2026-07-21
What Is Vishing? Voice-Phishing Scams Explained
Posted: 2026-07-17
What Is a Phishing Link? How to Check a Link Before You Click
Posted: 2026-07-14
What Is Quishing: Protecting Against QR Code Scams in 2026
Posted: 2026-07-10
How to Read an Email Header (and Spot a Fake Sender)
Posted: 2026-07-07
Why Choose a Canadian Email Provider? Privacy, Data & Compliance
Posted: 2026-07-03
What Is an MX Record? How Email Routing Works
Posted: 2026-06-30
Free Email Account Canada: Your Best Options
Posted: 2026-06-26